We all love homegrown tomatoes. Store-bought tomatoes don’t even come close to what a homegrown one tastes like. However, not everyone lives in a house with a big yard or a garden to grow them in. So, growing tomatoes in pots, buckets, or containers to the rescue.
That’s right, you can quickly learn how to grow tomatoes in pots just by following a few simple rules and instructions listed below. You will learn to produce any type of tomato in a container even if you live in a small apartment. You can still do it. Let me show you all the steps on how to grow tomatoes in pots and then we’d get into (very much needed!) details.
- 1. Prepare your container
- 2. Add your potting mix
- 3. Add essential minerals
- 4. Add rock phosphate
- 5. Place your tomato seedling in the container
- 6. Water it thoroughly
- What tomato variety is the best for a pot?
- What do tomatoes in pods need to grow?
- How to choose a safe container to plant your tomato in?
- Keep Consistent Moisture Level
1. Prepare your container
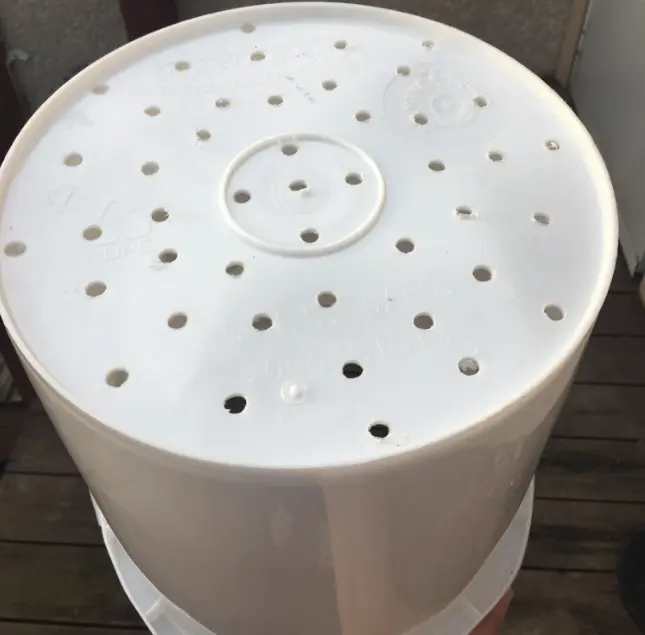
Once you get your pot or container, make sure you drill holes in it. Depending on the size of the container (I suggest a relatively large container – 5 gallons or 20-liter bucket), you can use 1/3 or 1/4 of an inch drill bit (or 5 to 6 mm). Make sure the holes are enough for good drainage.
2. Add your potting mix
Ideally, you have the organic potting soil that’s well draining next to you. Fill about 1/3 of the bucket with the soil. It’s as straightforward as that. But here’s an important tip that might make you laugh, but bare with me and you’d understand why we’re doing this.
Grab a single baby diaper (yes, you read that right), cut it in the middle and soak it in water. Allow it to sink for a few minutes, then grab the filler and add mix it up with your organic soil.
Diapers are made of non-toxic water-absorbing polymers that can hold hundred of times their weight in water but why we use them is to store moisture between watering. A consistent level of moisture is essential for a healthy tomato plant.
Can you skip the diaper part? Yes, but if you have one, just use it. You’d thank me later.
3. Add essential minerals
Add about a handful of gypsum powder (for calcium that the tomato plant needs) and about 1 tablespoon of Epsom salts (for magnesium) to the soil mixture. Make sure to mix it well.
4. Add rock phosphate
Make a small hole in the middle of the bucket and add a handful of rock phosphate to it. Do not mix it in with the rest of the soil though.
5. Place your tomato seedling in the container
The next step is to simply put the roots of your tomato plant right on top of the rock phosphate. Hold it with one hand in place and with the other, fill out the bucket with soil (right about the first set of leaves on the stem – if it looks too shallow or wobbly, just remove the first set of leaves and fill it in).
6. Water it thoroughly
The last step is to water your plant well and leave it to drain out. You may even tilt it to one side by putting an object underneath the bucket in order to get it to drain well. Water is good for tomatoes, but if the soil doesn’t drain well, it might cause root rotting.
But this would probably not happen if you drilled enough holes.
That’s it. It’s an easy process and it doesn’t take more than 7 minutes if you have everything next to you.
Let’s move to some of the details that you’d need to know in order to grow healthy and juicy tomatoes.
What tomato variety is the best for a pot?
There’s no “best” or “ideal”, pretty much every type of tomato can and will grow in a bucket or a pot. However, due to the smaller size, you can use one of the following varieties:
- Golden Grape
- Golden Nugget
- Cherry Cocktail
- ‘Tiny Tim’ Tomato
- ‘Patio’ Tomato
- Roma
- Black Pearl
- Yellow Currant
- Baby Red Pear
- Super Sweet
What do tomatoes in pods need to grow?
The simple answer – they need everything that all tomatoes in the ground or raised beds need in order to grow, blossom, and produce juicy fruit. However, a few specific things we have to mention:
1. Bucket size
In terms of size, it’s recommended that you use at least a 5-gallon container (or 22 liters) as the tomatoes would need some room to develop. You can still grow them in smaller pots (ie 1 to 3-gallon containers) if you don’t have enough space for a bigger one.
2. Moisture
They need a good and consistent level of moisture throughout the growing season. This is very important as the soil in the pot dries out much more quicker than the soil in the ground.
3. Sun
At least 6 hours of sunlight per day. Generally, the more sun you expose your tomato plant to, the more tomatoes it will grow. So pick the sunniest possible spot to provide enough sun exposure for your tomatoes.
In smaller places or apartments, this might be a bit tricky, but if you have a window where you can place the pot in, that would do the trick as well.
4. Essential Minerals
Just like the ground-planted tomato plants, those in a container also require the same 3 minerals – more specifically they are calcium, magnesium, and phosphorous.
When planting the tomato plant in a pot, you are the one who’d need to provide those three essential minerals. We’ll get to that further in the post.
5. Tomato Seedling
This article presumes you already have tomato seedlings ready to be planted in the pots. If you don’t have them yet, now it’s a good time to pause and go grab a few from your local nursery or kind neighbor with a garden.
How to choose a safe container to plant your tomato in?
Many people don’t even think about this, but not every plastic is safe to be used as a growing pot. The problem with the different plastic is that in some cases, they can be toxic and leach into the soil that’s into the bucket.
This also means that the growing plant (regardless of what you grow in it) would be affected by the toxicity. You certainly don’t want to eat a toxic fruit, right?
I’m sure you’ve all seen the sign underneath each plastic bottle – the one that contains a number and 3 circular arrows, sort of looks like a recycling symbol:
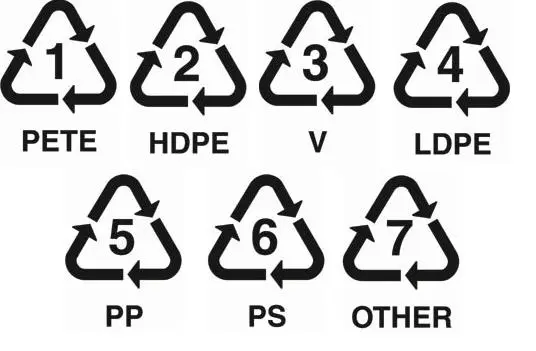
Without boring you with technical details of the plastic, you can safely use HDPE (High-Density Polyethylene) and LDPE (Low-Density Polyethylene) to plant and grow edible plants.
And while we’re still on the subject of containers, here’s a neat tip if you don’t want to (or you can’t) invest in one – you can go to the closest grocery store or restaurant and ask them to save you one or a few.
Restaurants and grocery stores get deliveries of pickles and other vegetables and they usually throw away those buckets. I’m confident they won’t mind giving them to you instead of throwing them away.
Important! Please, do yourself a favor and don’t try to grow tomatoes in terra cotta pots. The reason for this is very simple – they dry out really quickly and moisture is essential for tomatoes.
Keep Consistent Moisture Level
Keeping the moisture level of the soil where you’ve planted the tomato plant is crucial for its healthy state. There are a few things that you can do to make sure the moisture levels stay consistent:
- Add a drip system – this can absolutely help you with this, however, it might not be so cheap. Especially if you’re on a tight budget.
- The polymers – remember the diaper from above? Yeah, this is the reason why we’ve added those, to retain moisture until the next watering. However, even with polymers in the soil, you still need to check on it.
Water requirements would be different for everyone. It depends on many factors such as the sun, climate, wind, etc. Therefore, there’s no universal guide in terms of how often to water your tomato.
When in doubt about whether or not to water your tomato plant, perform the finger check. Stick your finger into the soil, about 2-3 inches deep (6-8 cm) and if you feel it’s dry, you definitely need to water it. If not – don’t water and wait a bit more.
Bottom Line
Planting a tomato plant is really not that complex. Once you understand what it needs to grow, the process of planting itself is very straightforward.
The next thing to do is to monitor the progress and the plant development. If you notice some unusual behavior, such as leave curling, make sure to take appropriate action.
Don’t forget to check out our more advanced growing tomatoes tips.


